101 Cooking For Two - Everyday Recipes for Two

Tuesday, December 28, 2010

KitchenAid Pasta Attachment - A Review


Just call this a toy report. One of the cool things about having a Kitchen Aid stand mixer is all the associated toys. I had my eye on the pasta attachment for the last year. In fact, I think I got the mixer in someway aiming for this attachment. Well this year, it went on and off my Amazon wish list several times. I thought I left it off finally but in one of the trips on and off the list, one of my daughters went for it. So it was a complete surprise.

A few weeks ago Rex at Savory Reviews ran his through a first run with inspiring results. So we had left over Chicken Parmesan that my wife made (excellent with some pepperoni for allot of taste). A great time for a trial run on my day off.

I cut the recipe in half (we are cooking for two remember). The final result were very good but I had a stumble or two to mention in-spite of the hints Rex had. The dough was too dry. I initially went with the recipe provided by Kitchen Aid, but in the end, I needed an extra teaspoon of water to make the dough hold together through the roller. I though it was too dry when I did the hand kneading but left it. I added the extra water when I found the dough would not hold together through the roller. I think that cutting the recipe may have had something to do with this.  

Recipe
1 3/4 cup AP flour
2 large eggs
1/4 t salt
1 1/2 t water (plus 1 t that I think is needed)

Method

1) Combine all ingredients in the bowl and mix on 2 for 30 seconds.
Too Dry!!
2) Move to surface and knead for 2-3 minutes by hand to combine all dough.
3) Let set for 20 minutes.
Also too dry, I added a small amount of water here.
4) Divide in half  and flatten to about 1/8 inch by hand. Start with the roller set to 1. Your initial few passes with by raggedy. Keep folding the dough in half and reincorporating any separated dough.
5) After 4-5 passes you should have a sheet of dough. Now change the setting to 2 and do several passes. Continue to narrow the roller until you have the desired thickens. I went for 4 in thickness.
6) Now change to the desired cutter and make your pasta.
7) Cook for 2-5 minutes.

 Conclusions
A very nice toy. There is a small learning curve. I was very afraid of cleanup before I read the instructions. I imagined soaking the thing and have multiple parts to clean, NOPE, just wipe it off and let any stuck dough dry and then brush off. 

The results even here on my first try were better than a restaurant. Now that I have had my learning curve about the dough consistency, it will be much faster next time. With all my fumbling tonight, it was about 50 minutes until we were eating. Cut about 10 minutes off that for the learning curve thing. 


Labels: , , ,

Monday, July 19, 2010

Freezer Burnt Chicken Breasts Rescue - Shredded Mexican

****SEE ANOTHER OPTION CHICKEN TORTILLA SOUP ****
I'm guilty. I'm sure nobody out there has ever had a full bag of freezer burnt skinless boneless chicken breast. But on the unlikely event this would happen to your stupid brother (my brothers are smarter than this), let's see if we can do something with this. 

I found a bag of those wholesale club chicken breast in the back of the garage refrigerator freezer we replaced last week. So this poor meat is dehydrated, tough and tasteless. In other words, it is already hockey pucks. So I need to add moisture, texture and taste. A job ideal for Mexican. I love to have shredded chicken for burritos and enchiladas so on with the rescue.

Click to Read More and Get Recipe

Labels: , , ,

Monday, April 19, 2010

Pulled Pork on a Gas Grill - First results

Update version : CLICK HERE.

Remember that the name of this blog is 101 meaning a beginning ... so I'm learning here. I'm jumped off the cliff. I'm biting the bullet. I'm risking all... You get the idea. I have conquer my fear of a fatty piece of pork cooked for 5 plus hours and my fear of getting smoke rolling out of my gas grill. Simply put Pulled Pork.

Last week we were in Ann Arbor and went a local institution, Zimmerman's Road House. The pork was great but the sauce even better. I had the Memphis BBQ sauce that I believe is called "Red Rage"- their own sauce. It was sweet and tomatoie and spicy all at once. They don't sell it by the bottle although they will sell you a small container. So to try to recreate that taste, I need properly done pork. But I wimped out a few months ago and used a pork loin recipe that I have used for years. I had though about it hard but just couldn't do it then. Call it fear of fat if you wish. But it's time to MAN UP!

So, I stopped at Sam's to buy the meat. I knew they had it but I never looked closely. Well, the smallest was a two pack of 20+ lbs. This is called "Cooking For Two" for a reason.  Off to the supermarket and I had them cut me a nice 6 1/2 pound pork shoulder blade Boston roast.

Now the recipe. I away peek at CI first. A 13 year old recipe for the gas grill. Looks like a good start. I read at least 5 more recipes and many blogs. Watched a couple of YouTube videos. Many recipes used brines, some used mopping solutions. This was going to be complicated enough without those. I many add them next time I thought.  And I chargeb ahead.

My Plan:
1) Use a rub but not a brine. I followed the CI rub but added garlic and onion powder.
2) Grill set up was oblivious but CI wanted the pork in a disposable pan. I would place it under the grid to catch dripping and add water to it for moisture. But mostly I wanted to expose more surface to the smoke and heat.
3) If the smoke ran out, I would add more hickory for more smoke flavor.
4) Some removed the fat cap, some didn't. I would.
5) CI moved to an oven for the last few hours. Things were stable on the grill so I just left it on.
6) CI recommended a grill temp of 275. Others were 250 to 325. I went with the CI recommendation.
7) CI stated 5 hours cooking. Others 1 hour per lb. So I felt 6-7 max.
8) End point should be a temp of 190 according to some. CI had no temp listed.

Results: Time problems. I went 7 hours and got to 170. I had no time left so off it came. The outside 1/3 was great. The remainder is cooked and can shred but doesn't pull apart. It tastes very good but not that fall apart meat you expect.

Rating 8 Taste 9 texture 7 ease 8 time 6

Notes: I'm publishing this as a learning experience. I expect to publish a recipe next time. So in a way, these are my notes to myself.
1) Given 2 more hours it would have been fine, 9 hours total. An OK method but way long. This would be good for the beer drinkers out there.
2) CI removes the meat after 3 hours, seals and moves to an oven. This is me next time. They do a specific 2 hours, I will get a meat thermometer in there to monitor and then go to 195-200.
3) Any rub should do and no rub with just a great sauce would be fantastic.

Final note: Don't be afraid grasshopper it really is relatively simple.

No printable recipe

Tools: Gas grill with at least 2 burners. Approx. 6 inch square disposable aluminum pan, approx 6X12 disposable aluminum pan, over thermometer, lots of smoking chips

Ingredients:
1 6-8 lb Pork Shoulder (Boston rump)


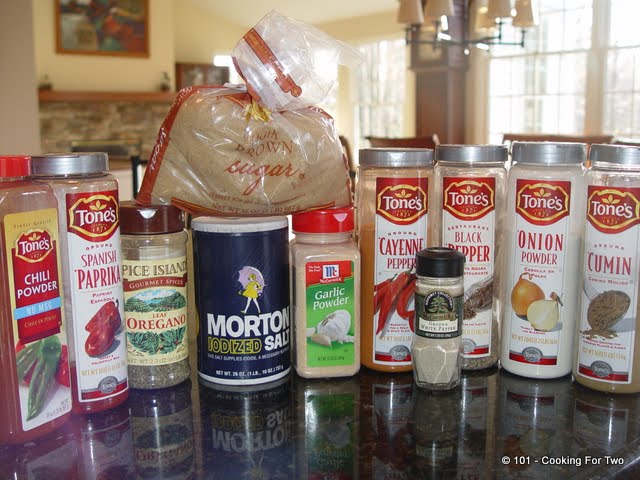
The Rub
1 T black pepper
1 T white pepper
1 T garlic powder
1 T onion powder
1 T dried oregano
2 T chili powder
2 T ground cumin
2 T table salt
2 T brown sugar
1 T sugar
4 T paprika
2 t cayenne pepper


Instruction:

1) Mix all rub components together in a container. Be sure to mix well, the brown sugar will lump.
2) Trim meat of any large cap of fat. (I want the rub and smoke to get to all the meat it can).

3) Rib a heavy coat of rub on to all surfaces of the meat. Wrap tightly with plastic wrap in both side to side and top to bottom directions. Refrigerate for at least 3 hours (up to 3 days is OK).

4) Soak 5-6 cups of smoking chips for at least 30 minutes. Several hours is better.
5) Let meat set at room temp for 30-60 minutes before grilling.

6) Set up grill. On the right remove grate and place small pan of soaked chips in far right corner. At least 3 cups of chips. Place larger aluminum pan under left grate, removing lava rocks if needed for space. Add 2 cups of water to this pan. Place oven thermometer in a spot you can see though a hole or by only partially opening the lid.
7) Turn the left burner on high and leave the other burner off. Heat until smoke is rolling well. About 20 minutes.

8) Place meat on unheated side and turn lite burner down to medium low. Balance the burner with the thermometer to maintain a 275 degree temp. I ended up on only a tiny bit off low.
9) Add more smoking chips every 1 1/2 to 2 hours to maintain some smoke.
10) Don't bother to check internal temp until about 5 hours. Cook until 195 degrees

11) Remove from grill and let set 1 hr to cool then shred and serve.

Notes: As stated in the discussion, this is about a 8-9 hour grilling time task. You could increase grill temp to 300-325 but I think that has some issues with it. Stay tuned for next version.

Labels: , , , ,

Tuesday, March 30, 2010

Julia Child's French Bread- kind of - version 1

April 6, 2010 update: go to newer easier version HERE

So I'm out of bread. And I'm home all day so time is no problem. No rush to get it done and raised. So given time and a stand mixer, can you do a better bread. I don't have time for the 18-24 hour traditional no knead and I want to use technology to conquer the world. I have watched a couple of videos with Julia Child's on bread making. The last one included 850 (yes that is right) hand kneads.

So I want to do a Julia inspired bread but without the work. Google time again and I found a wonderful site Sugar and Spice . I don't know who's recipe it is since I have seen the same recipe probably word for word on multiple sites, but she presents a lot of material very nicely. I copied the recipe but it (only the recipe) was still 9 pages long. OH MY.

A lot of the recipe was explanations and variations on loaf shapes. A lot on the oven. I'll strip those out. I'm just doing a large loaf and baking in my dutch oven. Still 6 pages but I want only one page. My mind can only handle one page. And it is just bread... well Julia Child's French Bread but still... bread.

So here is my simplification of the simplification. I highly recommend going back Sugar and Spice and reading her post. Very well done. and someday I will go to the original book and read.


I really (yes really) had every intention of following the recipe as much as possible and I did for 8 hours but then I ran a-muck. Actually while I could spend the 7-9 hours the recipe stated or even 12 but this just wasn't happening.

Maybe it was the house temp of 62 degrees. It felt warm to me (I have been in Michigan a long time) and I put the dough in the warmest room in the morning sun. This had been working fine. But I did up the thermostat to 72 after about 4 hours.

Maybe it was my yeast. It was the end of the bottle but it was only 4 months old and had a long time to out-date. It worked fine last week. So here is my one page version. I started to a-mucking in step 4 and from there on it's just me.

Results: 9 Should have had a little more rise. 9 for crust. 9 for Crumb. 9.5 for taste. Very near the best tasting bread I have ever had and better than the no knead loafs. Definitely worth doing in this form if you want.

Notes: Lots of fuss in the original recipe. Less in mine especially since I cut it "short" and baked it. But excellent results really. I will be repeating this with the third rise and some fancy shaping. But I'm waiting for warmer weather or I will "pre-heat" the house. New yeast is coming but I don't think that was the problem.

Other change ( yes I dare)
1) Bread flour maybe but probably not. Current AP flour is approximately equal to older French flour in protein content.
2) Mixing the yeast with all the water at the start and using 105-110 degree water. Give those little yeasteis a boost. Absolutely doing this.
3) Let the dough rest in the mixing bowl on the stand mixer in step 2. Decrease the fuss. Yep.
4) I like the large first rise if it will happen with the volume going from about 3 cups to 10 1/2 if it works. I got about 9 this time.
5) I will do the third rise and other forms if time permits.
6) I want to try this on a baking stone but the dutch over is so easy

PS it is only one page and will be less next time. YES!
Click to Read More and Get Recipe

Labels: ,

Tuesday, March 16, 2010

Single-rise Crusty Bread

This is a large loaf. 9 1/2 inch diameter and 3 1/2 inch height.
A wonderfully simple bread. A crusty open crumb bread complete in 3 hours.

I read too many recipes. I mean really way too many. I get confused about what technique is where with what recipe. I see too many things I want to try. This has things from at least 4 recipes.

So this is what I wanted to do and it worked wonderfully.
1) I've done no knead breads to get texture. I don't mind kneading in my Kitchenaid stand mixer. I believe the second rise usually gives a finer texture so I'm skipping that.
2) I wanted to use ingredients that we all have setting in our kitchens.
3) I want a crusty loaf so I'm using the dutch over.
4) I wanted a bigger loaf since I was going to bake in the dutch oven and I didn't want a pancake due to the large diameter.
5) I wanted a high liquid to flour ratio to keep the open texture.
6) I would do a loose mix initially and let it set for a while to hopefully help in gluten formation.


Click to Read More and Get Recipe

Labels: ,